
Table of Contents
- Understanding Application Lifecycle Management (ALM)
- The Role of Environment Strategy in Software Development
- Environment strategy in the Power Platform (Copilot Studio context)
- ALM and Environment Strategy in Copilot Studio
- Managed Environments in Power Platform (and Copilot Studio)
- Benefits of Managed Environments
- Integrating Managed Environments into Your ALM Process
- Kick-Starter-Kit for Copilot Studio ALM
- Conclusion
Content Classification
Content for IT decision makers - Level 100 (Background knowledge)
Content for IT professionals - Level 100 (Background & Integration knowledge)
Content for IT architects - Level 100 (Background & Integration knowledge)
Summary Lede
Building and deploying AI agents in Microsoft Copilot Studio requires a structured approach to development and deployment. This article examines how Application Lifecycle Management (ALM) principles and environment strategy collaborate in Copilot Studio. We’ll explore the stages of ALM, best practices for environment configuration, and how Managed Environments can strengthen governance while streamlining administration—helping teams balance innovation with control. In the second half of the article, you will find a step-by-step guide to set up your Copilot Studio environment for ALM and Managed Environments with Azure DevOps.
Understanding Application Lifecycle Management (ALM)
Application Lifecycle Management (ALM) refers to the end-to-end process of managing an application’s life cycle from initial conception, through development and testing, to deployment and ongoing maintenance. In software development, ALM is vital because it provides structure and traceability throughout the software development process. It ensures that everyone follows a defined process, so that changes are tested, quality is maintained, and deployments are repeatable and reliable. By managing the life cycle, teams can coordinate more effectively, identify issues early, and continually improve the application.
Key Stages of ALM: A typical ALM process includes several stages that loop in a cycle of continuous improvement:
- Planning & Requirements: Define the goals and requirements of the application. This includes gathering stakeholder input and designing the solution.
- Development & Build: Developers (or makers, in a low-code context) create the application or agent according to the requirements. Source control and versioning are used to track changes made to files.
- Testing & Quality Assurance: The application is tested in a controlled environment to verify functionality and performance. Bugs are identified and fixed. No change should reach users without passing quality tests.
- Deployment & Release: The tested solution is released to a production environment for end-users. In ALM, this step is performed in a managed manner (often via automated pipelines or release processes) rather than ad hoc, ensuring that releases are predictable and reversible.
- Maintenance & Monitoring: After release, the application is monitored in production. Feedback and issues are collected for future improvements. Patches, updates, and optimizations are continuously applied, which in turn inform planning for the next iteration.
The Role of Environment Strategy in Software Development
Alongside ALM, having an environment strategy is critical. In software development, an “environment” typically refers to a distinct instance or space where certain activities occur – typical examples are Development, Testing/QA, and Production environments. An environment strategy is a plan for organizing and managing these different environments to support the ALM process. It defines the number of environments required, their intended uses, the users with access to each, and the process for promoting code or configurations from one environment to another.
Why is an environment strategy important?
Without a clear strategy for environments, even well-built applications can face issues. For example, if everyone builds and tests in the same space, a bug fix might inadvertently impact users, or untested features could be introduced into production. A structured environment strategy ensures that development work is isolated, testing is thorough, and only approved releases reach end users, thereby reducing bugs and downtime. Microsoft’s Power Platform guidance emphasizes that having proper environments aligned to purposes such as development, testing, and production ensures solutions remain secure, scalable, and well-governed as they evolve. In short, environment strategy provides the “where” for each ALM stage – giving each stage a safe space.
Core elements of an effective environment strategy
Defined Environment Types & Purpose: Clearly delineate environments by purpose. For example, a Development environment for building and initial trials, a Test/UAT environment for user acceptance and quality assurance, and a Production environment for live running of agents. Each environment’s role should be well-defined so that everyone knows where to build and where to observe without making changes.
Data and Security Boundaries: Use environments to enforce data isolation and security policies. Sensitive data should reside only in specific environments. For instance, you might allow broad connector usage in dev, but restrict specific connectors in prod to comply with data privacy rules. Environment-specific Data Loss Prevention (DLP) policies can prevent makers from connecting to unsanctioned services in that environment.
Governance and Monitoring: Treat each environment as a scope for governance. Admins should monitor environment usage – e.g., track the number of apps or agents, identify their creators, and ensure compliance with IT policies in each environment. Regular audits of what’s in a given environment help catch problems (like an app with sensitive data in a non-compliant environment) early.
Lifecycle Management and Maintenance: Maintain environments actively. This involves cleaning up unused resources (such as removing old prototypes from the production environment), and updating environment configurations as needs change. It’s not “set and forget” – new projects might require new environments or the archiving of old ones—a good strategy plans for environment creation, retirement, and backup.
User Roles and Permissions: Control who can do what in each environment. For example, in a production environment, you may only allow a few administrators or a service account to deploy solutions. In contrast, in a dev environment, many makers can have contributor access. Clear roles (like environment admin, maker, tester, viewer) prevent accidental modifications and enforce accountability.
With these elements in place, an environment strategy yields significant benefits:
- streamlined development processes,
- reduced risk of cross-environment interference,
- and easier collaboration.
When every team member knows which environment to use for a given task and what rules apply there, they can focus on innovation without worrying about stepping on each other’s toes. For stakeholders and IT administrators, a well-planned environment landscape provides confidence that applications are built and deployed in a controlled and secure manner.
Environment strategy in the Power Platform (Copilot Studio context)
Copilot Studio is built on Microsoft Power Platform, a low-code environment that heavily leverages the concept of environments. In Power Platform, an environment is a container for apps, flows, data (Dataverse), and now Copilot Studio agents. This means your Copilot agents live in a specific environment. A best practice for Power Platform (and thus Copilot Studio) is to separate development from production environments. For example, you might have:
- An Agent Dev environment where new agents and updates are built and unit-tested.
- A Agent Test (or UAT) environment where agents are imported for broader testing or user acceptance testing.
- A Agent Production environment where only thoroughly tested, approved agents run for end-users or the business.
Such separation aligns with ALM stages (build in Dev, validate in Test, release in Prod). It prevents a situation where someone’s experimental agent update immediately affects real users. Microsoft explicitly recommends moving Copilot agents out of the default environment and into dedicated environments for proper deployment. The default environment in Power Platform is a shared space where every user has maker permissions by default, which is risky for production use. A good strategy is to reserve the default environment for personal productivity or experimentation, and not use it for critical agents. Real deployments should occur in well-governed environments that are explicitly designated for production.
ALM and Environment Strategy in Copilot Studio
How do ALM and environment strategy come together in Copilot Studio? Microsoft Copilot Studio provides integrated tools to manage the application life cycle of your AI agents in a low-code way, leveraging the environment strategy to partition the stages.
Copilot Studio, as part of the Power Platform, has ALM capabilities built in, meaning you can perform tasks such as solution management and pipeline deployment directly from the management interface. In traditional software, moving an application from dev to prod might involve complex DevOps scripts or separate tools. In Copilot Studio, since agents are built on Power Platform’s solution framework, you can package an agent (and its related components) into a solution. This solution can then be migrated between environments (e.g., exporting from Dev, importing to Test, and then to Prod) with just a few clicks. Furthermore, one-click pipelines can automate this promotion process, deploying agents across environments quickly and consistently. The ALM integration means even citizen developers can follow a proper lifecycle without needing to leave the platform.
Separate Development, Test, and Production Environments
A cornerstone of environment strategy is using multiple environments to mirror the ALM stages. For Copilot Studio agents, you should build and refine your agent in a development environment, test it in a staging/test environment, and only then publish it in a production environment. This way, the “Publish” action in Copilot Studio is not simply releasing untested changes to users. Still, instead, in an ALM setup, you might publish to a test environment first, verify everything, and then promote the agent solution to the production environment. Following this approach ensures there’s a formal testing phase and an audit trail of what changes went live when. It contrasts with the risky strategy of building directly in production or the default environment and hitting publish (which, as some experts point out, bypasses the safeguards that make software resilient).
Governance Zones Model
Many organizations adopt a “zones” model for environments, sometimes referred to as Safe, Collaborative, and Enterprise zones (or Dev/Test/Prod).
In Copilot Studio, you can align to this model by setting up your environments as follows:
- Safe Innovation Zone (Development): A place where makers have freedom to create and experiment. Fewer restrictions here encourage innovation, but this environment isn’t customer-facing. It’s isolated from real business-critical data.
- Collaboration/Validation Zone (Test/UAT): A middle-ground environment where solutions are shared with a limited audience (like testers or subject matter experts) for feedback. It has more controls than Dev (to mimic production conditions), but is still not open to all users.
- Enterprise Zone (Production): The live environment for mission-critical agents. Highly controlled, only admins or pipeline processes can import solutions here. Strict policies (security, compliance) apply.
Using such a model ensures proper gating of the ALM process – agents only move to the next zone when they meet quality and compliance criteria. Copilot Studio agents should ultimately live in the Enterprise zone to be considered truly “in production” and not just an experimental bot in a sandbox.
Production Environment Strategy – Shared vs. Dedicated
When designing the production stage for multiple Copilot agents, another consideration is whether to use a shared production environment or dedicated environments per agent (or per solution).
- A shared production environment means you deploy several agents into one environment (one Dataverse backend). This can simplify management (fewer environments to maintain) and works because Copilot agents are offered as SaaS—meaning multiple agents can coexist. However, the trade-off is that they share resources and settings; one misbehaving agent could potentially affect the environment’s capacity or policies that impact others.
- A dedicated production environment means each agent (or each major project/team) gets its environment. This provides strong isolation—each environment can be tuned for the specific agent’s needs (data sources, capacity, DLP policies) without impacting others. This is recommended for business-critical or high-impact agents. For example, if an agent handles very sensitive customer data, placing it in its own environment helps ensure that data residency and compliance rules can be specifically tailored, and there’s no risk that another agent’s changes will inadvertently break this one. The downside is the overhead of managing multiple environments as you create more agents.
Key factors to decide shared vs. dedicated: the criticality of the agent, data sensitivity, performance needs, and your operational capacity. If having one environment per agent is too burdensome. However, you still want isolation. One compromise could be to group agents by department or risk level into different prod environments (e.g., one environment for Finance agents, one for HR agents, etc.). The goal is to balance manageability with risk: use dedicated environments for the most critical use cases, and shared environments for less critical agents where the overhead of many environments isn’t justified.
Solutions and Pipelines (DevOps for Copilot)
In Copilot Studio, agents are solution-aware Dataverse components, meaning you manage them like other Power Platform solutions. Adopting solutions is essential for ALM: if you keep an agent within a solution, all its components (such as flows, connections, etc.) can be versioned and moved as a single unit. Coupled with a pipeline, this allows proper version control, change tracking, and even rollback if needed. For instance, if a new version of an agent fails tests in UAT, you can avoid deploying it to production and keep the production environment on the last known good version. Pipelines (which can be set up using the Power Platform pipeline tools or Azure DevOps/GitHub actions) ensure that promotion from development to testing to production is automated and consistent. With Copilot Studio’s integration, makers can trigger these deployments with minimal complexity. This closes the ALM loop: you’re not just building AI agents, you’re deploying them in a governed, repeatable way—just like any enterprise software. In practice, ALM and environment strategy in Copilot Studio mean treating your AI agents as enterprise applications. Develop in one environment, test in another, release in a controlled environment, and manage changes through solutions. This approach leads to reliable agents (they’ve been tested), auditable (you know what version is where), and secure (they run with proper data boundaries). It transforms Copilot Studio from a toy into a professional platform for innovation.
Managed Environments in Power Platform (and Copilot Studio)
While having multiple environments and ALM processes brings control, it can also introduce complexity for administrators. This is where Managed Environments come into play. Managed Environments is a feature set in Microsoft Power Platform designed to simplify environment governance. When you designate an environment as “Managed,” you unlock a suite of premium management capabilities that help admins oversee and govern the Power Platform on that environment with more control, less effort, and more insights. In essence, a managed environment incorporates many of the best practices that administrators would want to enforce, making them built-in features. It’s like putting an environment on “autopilot” for governance: the platform will automatically provide analytics, enforce certain limits, and make it easier to apply policies.
How Managed Environments differ from standard environments:
To understand the value, let’s compare a normal Power Platform environment to a Managed Environment:
| Aspect | Standard Environment | Managed Environment (enabled) |
|---|---|---|
| Governance Tools | Basic admin settings (manual governance via scripts or CoE toolkit). | Advanced out-of-box governance (one-click setup for sharing limits, welcome messages, etc.). |
| Sharing Control | Makers can share apps freely (unless admin manually restricts). | Limit Sharing feature to restrict how broadly apps/agents can be shared (e.g., limit the number of users or block sharing to the entire organization). Admin review is facilitated before wide distribution. |
| Usage Insights | No automatic usage reporting; requires custom analytics (e.g., using the CoE Starter Kit). | Weekly digest reports are automatically emailed to admins, showing top apps, active users, and inactive resources in the environment. Provides visibility into adoption and identifies areas for improvement. |
| ALM Pipeline Support | Solution import/export possible; Pipelines require setup (and were traditionally separate or in preview). | Pipelines built-in – easy setup for deployment pipelines between Managed Environments, streamlining ALM. (Note: using the Power Platform Pipelines tool requires the environments involved to be managed for full functionality.) |
| Solution Quality Checks | Manual Solution Checker, run by makers or upon import if desired. | Automatic Solution Checker on import – Solutions are evaluated against best practice rules; admins can choose to warn or block imports if issues are found, preventing the deployment of poor-quality solutions. |
| Data Policies (DLP) | Admin sets tenant-level or environment DLP policies manually. | Environment-level DLP visibility – Managed Environments make it easier to see and manage data policies per environment (filtered views) and ensure uniform data handling rules are applied. |
| Security Enhancements | Standard security (Azure AD roles, environment roles, connector restrictions manually set). | Extra security features – such as IP address filtering (firewall) for that environment’s connections, conditional access per app, and even Customer Managed Keys for encryption. These features help ensure data in the environment stays within allowed networks and is highly secure. |
| Maker Onboarding | Generic experience (makers see default Microsoft guidance). | Customized welcome content – Admins can provide custom guidance or contact info shown to makers in that environment, helping enforce company-specific best practices from the start. |
| Admin Effort | High effort – requires building governance processes or utilizing the CoE toolkit, with ongoing manual monitoring. | Lower effort – governance is simplified and automated (less need for custom admin work), allowing IT to manage more environments at scale with the same resources. |
From this comparison, it’s clear that Managed Environments supercharge an environment with capabilities that would otherwise require additional tools or significant manual oversight.
Enabling a Managed Environment
To use these features, an admin (with proper roles, such as Power Platform Admin or Global Admin) enables the managed environment mode for the chosen environment. This can be done in the Power Platform Admin Center by selecting the environment and toggling on Managed Environments. There’s no separate product to install – it’s a service built into Power Platform. It’s worth noting that Microsoft Copilot Studio licenses include entitlement to Managed Environments, allowing organizations using Copilot Studio to take advantage of these governance features without incurring additional licensing costs, as long as they have a Power Platform environment for their Copilot agents.
Benefits of Managed Environments
Managed Environments offer numerous benefits that address common challenges in administering multiple development environments:
Stronger Governance & Control: Managed Environments enable administrators to enforce guardrails easily. For example, the limit sharing feature allows an admin to ensure that a Canvas app or Copilot agent isn’t arbitrarily shared with the entire company without oversight. They can restrict sharing to specific security groups or cap the number of people an app can be shared with. This prevents the proliferation of unapproved apps and ensures that critical solutions receive proper review before mass usage. Essentially, it fosters a governed citizen development where makers have freedom to create, but within sensible limits set by IT.
Enhanced Visibility and Insights: One key pain point for IT teams is identifying what users are building on these platforms and how those apps are utilized. Managed Environments address this by providing weekly usage insights. These are automatic email digests that summarize key metrics of that environment: how many apps and flows are active, who the top makers are, and which resources haven’t been used in a while. For instance, an admin might learn that new apps were created this month, or that a particular agent hasn’t been used in 60 days (indicating it could be cleaned up). This level of insight helps prevent sprawl (i.e., numerous orphaned or unused apps) and enables administrators to manage resources proactively. It builds better visibility - admins see not just problems after they occur, but get information to act before something becomes an issue (like capacity running out or too many unused apps cluttering an environment).
Streamlined ALM with Built-in Pipelines: Managed Environments significantly simplify the ALM process by incorporating Power Platform Pipelines as a built-in feature. Traditionally, to implement ALM, one might use Azure DevOps or GitHub Actions to move solutions from development to production. Now, with pipelines in the platform, even non-developers can set up a deployment pipeline via a simple interface. By enabling the pipeline feature, makers can easily push a solution from one environment to another with minimal effort, thereby reducing the risk of errors during deployment and accelerating the release cycle. It also encourages the use of multiple environments (since moving changes between them is easier than ever). It should be noted that both source and target environments in a pipeline need to be managed for this to work, incentivizing organizations to manage all their ALM environments.
Additionally, the Solution Checker integration enables the platform to automatically run static analysis each time a solution is imported (as part of a pipeline or manually). This analysis helps catch common issues and bad practices, issuing warnings to the team or even blocking the import if serious problems are found. This ensures higher quality solutions are promoted through your ALM pipeline.
Improved Security & Compliance: Managed Environments incorporate additional security measures that are essential for enterprise scenarios. For example, an administrator can set up an IP firewall to restrict access to the environment’s data, allowing only requests from specific IP addresses or network locations. This is useful if your organization wants to ensure that only users on the corporate network (or VPN) can use the apps/agents in that environment. There’s also support for customer-managed encryption keys and features like Lockbox (which provides an audit trail and control if Microsoft support accesses your environment for troubleshooting, ensuring they have approval). These features collectively mean that environments can be locked down to meet strict compliance requirements—essential for industries such as finance or healthcare. Data policies (DLP) can be applied more granularly with visibility per environment, which helps in multi-environment setups to enforce that, say, no one can connect a social media connector in the production environment that contains customer data. In short, Managed Environments help maintain data boundaries and security standards automatically across the board.
Reduced Administrative Effort: Perhaps one of the most significant benefits is how these features save administrators time and effort. Many governance tasks that would require building custom solutions or running scripts are now provided out-of-the-box. For example, previously, an admin might have had to run reports to find stale apps or use the Center of Excellence (CoE) toolkit (a collection of Power BI dashboards and flows) to get oversight; with Managed Environments, the platform itself surfaces these insights weekly. Controlling sharing used to rely on educating makers or periodically reviewing sharing logs; now it’s a simple setting. Microsoft has effectively embedded shared governance best practices into the product. This lightens the load on IT and the Center of Excellence teams. They can manage more environments (and thus support more development projects) with the same effort, scaling citizen development safely. It also means fewer mistakes: automated enforcement is consistent, whereas manual governance could miss things.
Better Maker Enablement: By providing a tailored welcome message or helpful links (using the custom maker welcome content feature), Managed Environments ensure that makers see your organization’s guidance as soon as they start creating in that environment. For instance, an admin can include links to internal ALM guidelines or support contacts. This helps new makers follow the rules from day one, leading to better compliance and fewer support issues down the line.
Overall impact on team efficiency: With ALM best practices and Managed Environments, development teams can move faster because they’re not slowed down by chaos or rework. Initially, governance features slow down development. Still, in practice, they prevent costly mistakes (such as having to fix a broken production agent) and reduce the need for manual checks. Teams can trust the process: when they promote an agent to production, they know it has passed checks and is running in a secure setup. This confidence means more time spent on adding features and less on firefighting. Moreover, business users (citizen developers) can innovate in development environments without waiting for IT, yet IT still maintains oversight in production – a win-win for productivity and control.
Integrating Managed Environments into Your ALM Process
To maximize the benefits of Copilot Studio, organizations should integrate an ALM process and environment strategy with the capabilities of Managed Environments. Here’s how you can integrate these elements step by step:
Step 1: Plan Your Environment Architecture
Begin by defining your environment strategy. Identify how many environments you need (dev, test, prod, etc.), and decide which teams or projects will use which environments. Also determine if specific agents require dedicated environments. This planning should align with your ALM stages – e.g., a Dev environment for building, a Test environment for QA, and a Prod environment for releases. Establish naming conventions and access roles for each climate (who will be admins, who will be makers).
Step 2: Enable Managed Environments
For each critical environment in your strategy (especially those used for production and testing), enable the Managed Environments feature. Typically, you’d turn it on for your Test and Prod environments first to gain governance on the ones that matter most. You can also enable it on Dev to get insights into development activity. Please ensure that you have the necessary admin roles and licensing in place (Copilot Studio users typically have this available). Once enabled, please verify that the environment now displays the Managed Environment options in the Power Platform Admin Center.
Step 3: Configure Governance Settings
After enabling Managed Environments, configure its features to suit your policies. Set up Limit Sharing rules on production environments to prevent makers from oversharing agents or apps without approval. Configure Data Policies for each environment (for example, allowing connectors that are blocked in Production). Add any additional admin recipients for the weekly insights email so the right people get the usage reports. Also, decide on Solution Checker enforcement: do you want to warn on potential issues, or block solutions with critical issues from being imported to prod? Tailor the managed environment settings so they align with your organization’s compliance and quality standards.
Step 4: Implement ALM Pipelines
Now integrate ALM automation. Could you set up Power Platform Pipelines or another release mechanism to automate the flow between your environments? Because your environments are managed, you can use the friendly pipeline UI in Copilot Studio or Power Platform to deploy agents from Dev to Test to Prod. Ensure that solutions are used for all Copilot agents, allowing for deployment through pipelines. Test the pipeline with a sample solution to ensure it moves components and that the solution checker runs as expected. This step builds the bridge in your ALM process, making promotions consistent and documented.
Step 5: Train the Team and Refine
Introduce these practices to your development team and citizen developers. Provide training or documentation on how they should package their Copilot agents into solutions, and how the promotion process works (so they don’t just hit “Publish” in Dev without following ALM). Also educate them on any new limits (for example, if they attempt to share an app and encounter a limit due to Managed Environments, they should be aware that it’s not an error but instead by design). Over time, utilize the insights from Managed Environments to refine your strategy. If you notice many unused artifacts, adjust your governance; if you encounter capacity issues, consider adding another environment or increasing storage; if the policies are too strict and hinder necessary work, consider tuning them. ALM and environment management is a continuous improvement cycle – gather feedback and evolve the process.
Kick-Starter-Kit for Copilot Studio ALM
Setup the Basics
-
Go to the copilotstudio.microsoft.com
-
Confirm you are in the correct environment (top-right corner).
-
Open the Solutions area

-
Create a solution

-
Select “+ New solution”.
-
Enter a display name.
Avoid names like DEV, TEST, PROD, or any other terms tied to a project lifecycle phase. You can use a descriptive, project-based name.
- Create a publisher
If this is your first solution, click + New publisher to create one.
You can use your organization’s name if you like. While the Display name may contain spaces, the Name can’t contain special characters and spaces. Define a short prefix for use in technical names.
Please don’t use the default publisher or the default solution. Custom publishers ensure cleaner component names and better ALM hygiene.
-
Set and create
Select “Set as your preferred solution” (so that any new component is added to it by default). -
Click Create.
Setting Up Azure DevOps
-
Navigate to my.visualstudio.com/subscriptions
-
If not already signed in, log in
-
Select “Join Visual Studio Dev Essentials”
-
Confirm
-
Under Subscription / Program, select Visual Studio Dev Essentials
-
Select Azure DevOps to open the Azure DevOps portal.
-
In the Benefits tab, for Azure DevOps, select “Get started”.
-
When prompted, select Continue.
-
Name your organization (you can leave the default name) and select Continue.’
-
Create a new project by setting a project name. For example “Agents”.
-
Select + Create project.
-
After project creation, go to Repos → Branches.
-
Select Initialize (at the bottom) to create the main branch with a README or .gitignore.
Connecting Microsoft Copilot Studio to Git
-
Go back to Microsoft Copilot Studio and open the Solutions page.
-
In the menu, select “Connect to Git”.

- Set Connection type to Solution.

-
Choose your organization and your newly created project and repository.
-
Set the Root Git Folder to “Solutions”.
-
Select Next, then pick the solution created before.
Observing the Git integration from Microsoft Copilot Studio
-
Open the solution you created before.
-
In the left-hand navigation, navigate to Source control.
See how the various components you have added to your solution are now committed to your source control. If you don’t see them all, select “Refresh”.
- When ready, select “Commit”, add a comment describing the changes you’re introducing

Access Power Platform pipelines
-
Navigate to the Copilot Studio home page
-
Go to the Solutions menu of your DEV environment
-
Select the solution you had created previously
-
In the left navigation, select Pipelines.
-
Select “+ Create new pipeline”.
Configure pipeline basics
-
Enter a Name for your pipeline, e.g., “your solution name pipeline”.
-
Set a Description to explain the Solution’s purpose (e.g., Automated deployment of agents from DEV through TEST to PROD).
-
Select the TEST environment as the Target environment.
-
Save the pipeline configuration.
Set up deployment stages
-
In the command bar, select “Add stage” to create the first stage.
-
Name it PROD and select the PROD environment.
-
Save the stage configuration.
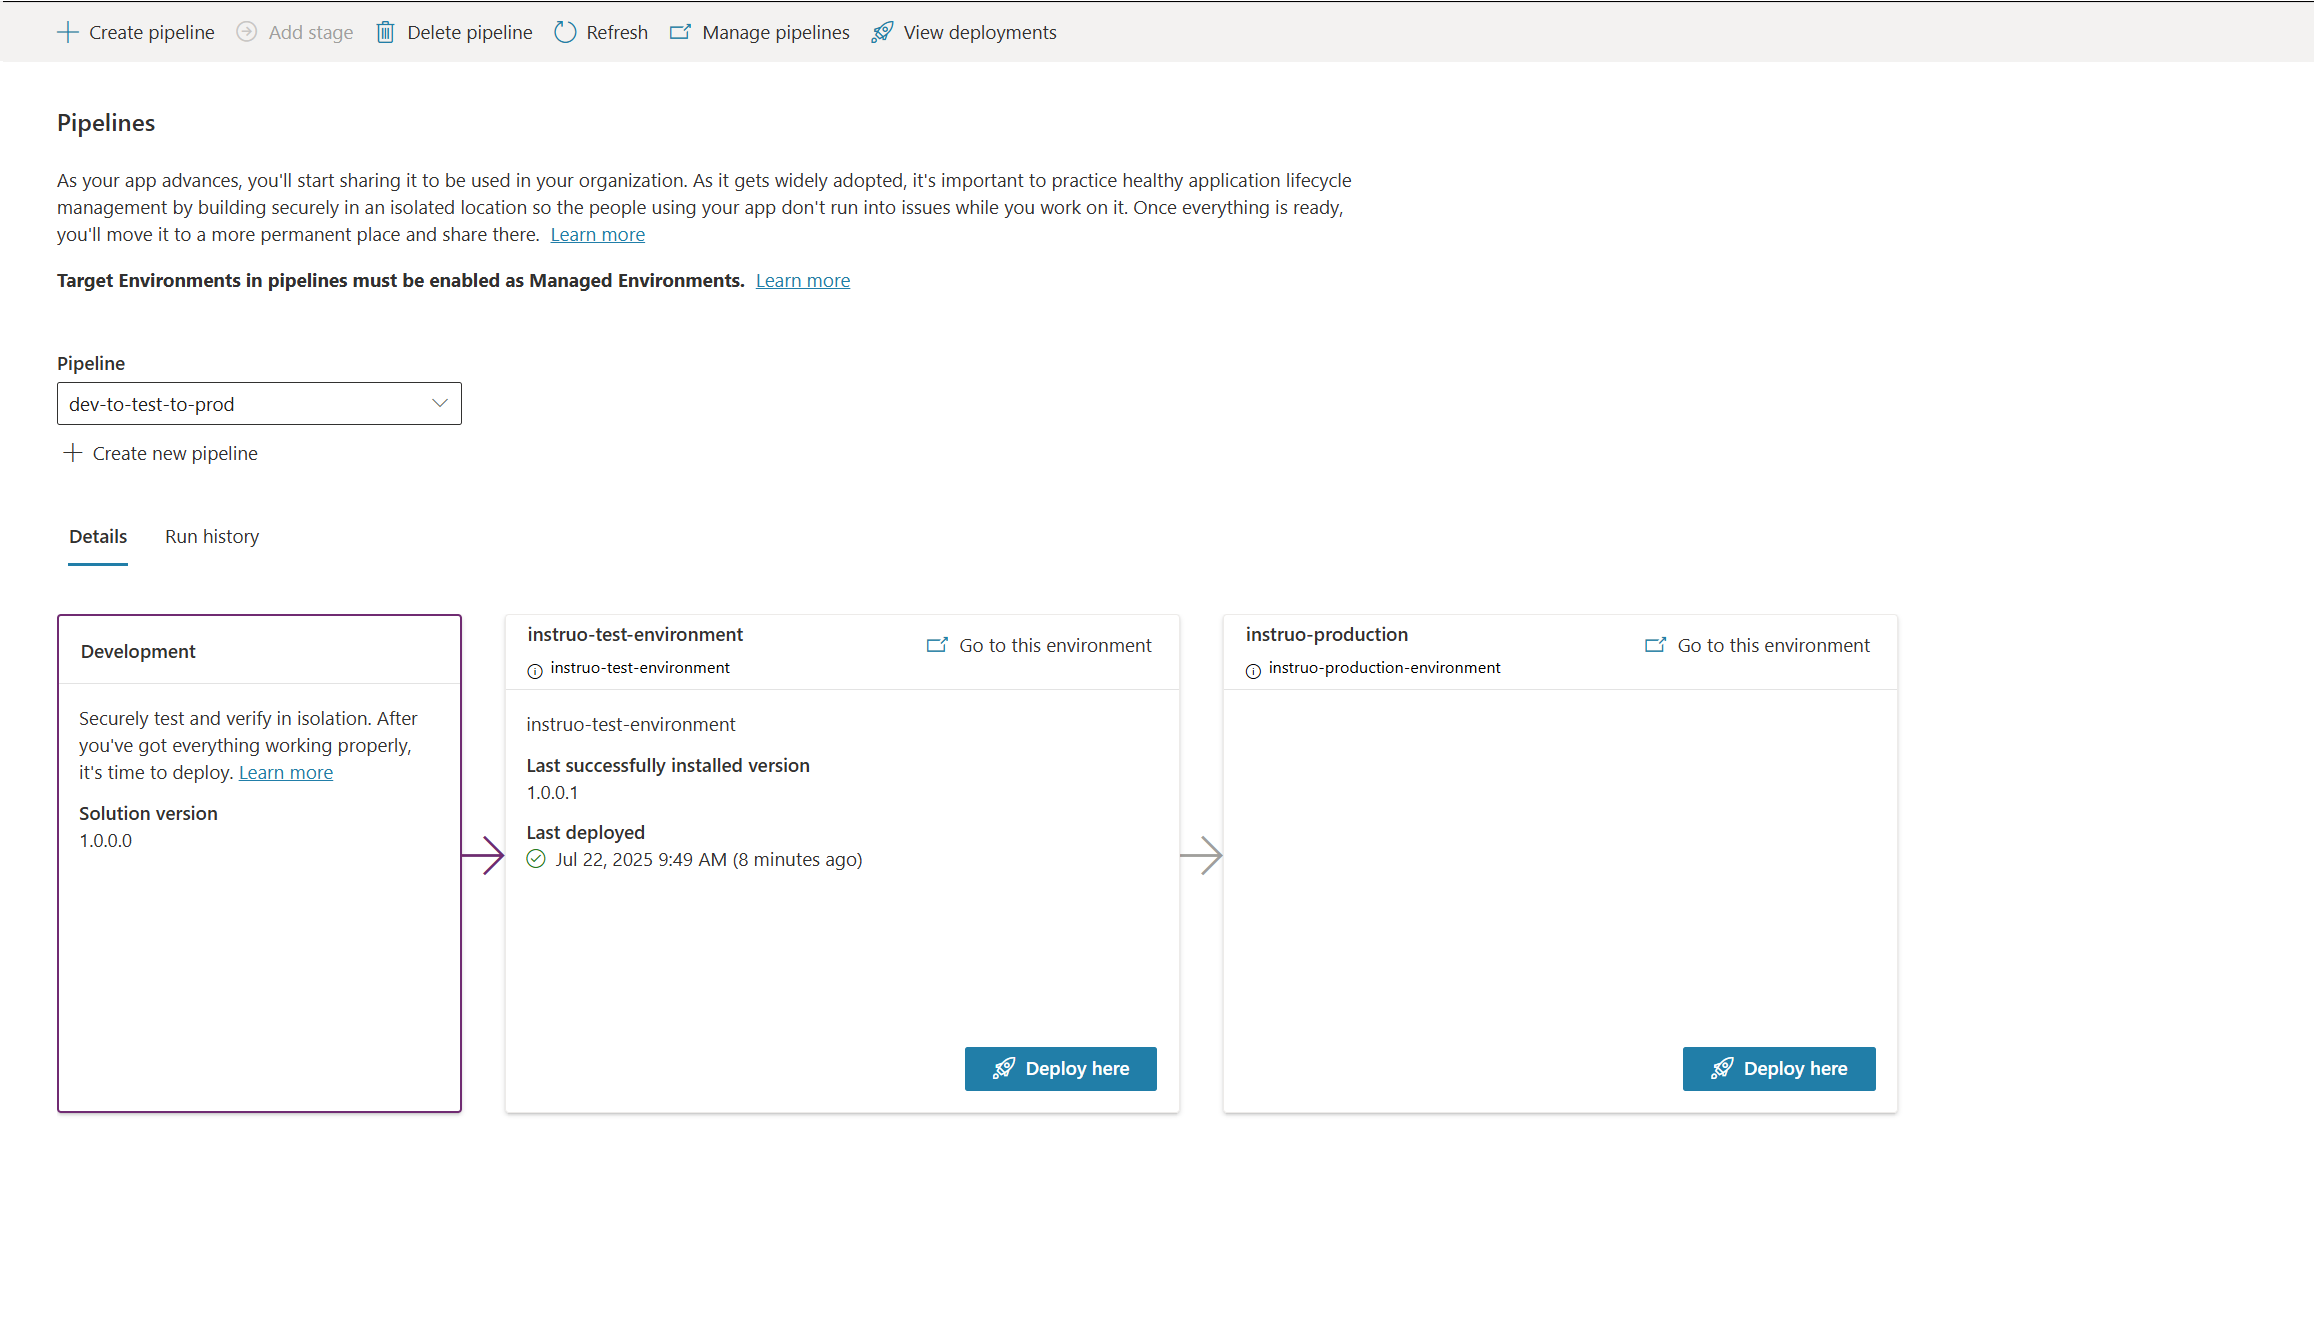
Test your pipeline
- In the TEST card, select Deploy here.
- Repeat the operation for the PROD stage.
In Copilot Studio, switch to either the TEST or PROD environment. See what the agents look like in each environment. When entering a change, see how customizations are locked because the Solution is managed.
additional links
Overview of pipelines in Power Platform
Export and import agents using solutions
Extend pipelines in Power Platform
Overview of Git integration in Power Platform
Conclusion
By combining a solid environment strategy with Managed Environments and ALM practices, organizations can effectively govern their Copilot Studio agents. This approach not only enhances security and compliance but also streamlines development processes, enabling teams to innovate faster while maintaining control over their AI applications. The integration of Managed Environments into the Power Platform ecosystem provides a robust framework for managing the entire lifecycle of AI agents, ensuring they are built, tested, and deployed in a structured and efficient manner.

